
December 5, 2021
Torque XLC: Behind the Scenes
For those of you who have ventured here, this is the place where you will learn about how Torque XLC, the coaster inspired by S&S launch coasters was produced and how it operates. Before we begin, I want to clarify a couple of terms that I will be referencing throughout this post.
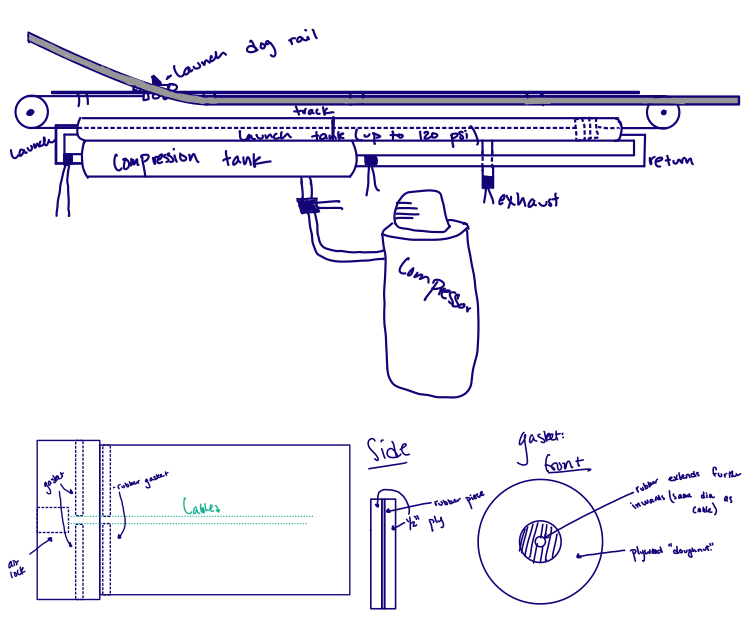
First, the launch piston is a 4” diameter stack of plywood that is located inside the launch pipe. This is what the air pushes on during the launch, and two cables are connected to either end of this piston.
The launch pipe is the 4” PVC pipe that runs down the entire length of the launch section, which encases the launch piston. During launch, this is what the compressed air is fed into.
Lastly, the catch car is what grabs onto the underside of the car and pulls it down the track. This is connected to the same cables as the launch piston, meaning when the piston moves, the catch car will as well.

Before we begin with the technical analysis, here are some interesting statistics about the coaster. At peak operating pressure, the system is able to create almost 1000 lbs of force and is able to accelerate a 70 lb car to 25 miles per hour in just over half a second. The length of the track is around 75 feet, while the car will traverse around 140 feet due to it being a shuttle coaster. The zero-G spike is 15 feet tall, and the car will only reach the top without a passenger. Lastly, all components and pieces of this ride were hand designed by me, with only inspiration from different sources. No templates or previous designs were used. It is completely custom.
Now that I’ve gotten all that out of the way, let’s start with the construction. All track cross ties and spine were fabricated out of ¾” plywood, which was cut using the ShopBot CNC. This allowed for all the pieces to be precise, allowing for a smoother experience. The supports for the track were all built out of standard 2×4’s on site, as I couldn’t predict the terrain it would be sitting on. The rails were made out of 1.5” PVC and were bent to the shape of the track using a heat gun. All track pieces were then aligned and put together on site.
This last section is going to go into the steps for launching the car and how that system operates. First, my 29 gallon compressor will fill an auxiliary tank that is sitting next to the launch section. This auxiliary tank is needed as it can release a much higher volume of air than the compressor can. This is because the compressor has standard ⅜” piping, while the auxiliary tank has a 1.5” output pipe. This allows for rapid air release, meaning the car will accelerate and go faster. Once the tank is filled to the desired pressure, the system is ready to be launched. When released, the high pressure air goes through piping to the launch pipe. When the air enters and presses on the launch piston, it is catapulted down the pipe towards the other end. As this piston is connected to a cable system and the catch car, it means the catch car accelerates the car down the track very quickly. When the piston approaches the end of the launch pipe, it passes an opening in the pipe, allowing for the air to then be exhausted out of the system, slowing the piston down. As the cable and pulley system, are a closed loop, the rear pulley is not put under tension while launching, simply put can actually go slack. To combat this, when the launch solenoid is opened, it also delivers air to pneumatic pistons which push the rear pulley back, tightening the cable around this pulley. If that doesn’t really make sense, I will link a video to Top Thrill Dragster at Cedar Point which does the same thing. After launching, the car goes over the bunny hill and up the spike. It will then fall back down and go through the course in reverse. Upon reaching the launch section again, it will contact the catch car and slow down due to the launch piston now compressing the air in the pipe. This means the system is able to accelerate and decelerate the car without any other assistance. Once slowed, the car is pushed back to the start of the launch section to reset the system. All design drawings and videos will be attached to this post that I welcome you to check out. Thank you so much for reading to this point, and I hope you enjoy the schematics below!